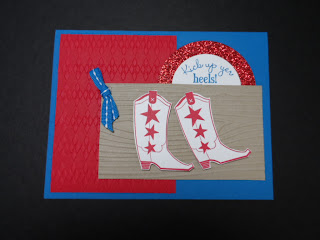
Kick up 'yer heels...
...and dance! Have you noticed that I use this stamp set A LOT?! It's one of my favorites because there are boots for just about every occasion. Here are some tips to re-creating this card. 1) There's LOTS of texture on this card. The two different embossing folders and that gorgeous red glimmer paper. Don't be afraid to mix it up by using different textured elements in one card. The secret to a good card is not the texture, it's the colors. The best rule of thumb is never to use more than three different colors in one card. Neutral colors like white, vanilla and black, for example, don't count as a "color". The only exceptions to my "three color rule" would be for a bouquet of flowers or balloons. 2) Always stamp your words first THEN punch them out. You're guaranteed to get them centered every single time! 3) The glimmer paper is thicker because of the glitter. Be sure to punch with "purpose". No weenie punching...line it up, punch firmly, with intent, and you won't have any stray 'cardstock hairs'. 4) Wonder how I made that little loop of ribbon? Begin by making a bow but pull the second loop all the way through leaving just one exposed. Pull the knot tightly so it doesn't come apart. Attach it with a glue dot. 5) The words are actually a part of the boot image. I used the brush side of my marker, colored in only the words I wanted and stamped. This is a great tip because you can use words from ANY stamp to create the sentiment you want. Look carefully at what you already have and marker away!
Supplies:
Stamp Set: Bootiful Occasions (pg. 50)
Cardstock: Pacific Point, Real Red, Whisper White, Crumb Cake, Red Glimmer Paper (pg. 160)
Ink Pad: Real Red
Marker: Pacific Point
Big Shot: Argyle embossing folder (pg. 189), Woodgrain embossing folder (Holiday Catalog pg. 33)
Punches: 1 3/4" circle, 2 1/2" circle
Accessories: 1/4" stitched grosgrain ribbon (pg. 173), Glue Dots, Dimensionals, SNAIL adhesive


No comments:
Post a Comment